What to draw when you're bored? What you can draw with paints The easiest drawing with paints
Drawing classes help you relax, calm down and escape from everyday, everyday problems into the world of dreams and fantasies. You can start drawing with anything: pencils, gouache, charcoal, oil paints, watercolors. But only a box of watercolor paints familiar from childhood can give a ticket to childhood, a world of fantasy and adventure. What can you paint with watercolors?
Where to begin
Easily help you create the most different images, landscapes, still lifes, everything your heart desires.
To begin with, you should arm yourself with desire, patience, various brushes, paints, a palette and water containers. Sometimes it is useful to have sponges, paper napkins, as well as simple pencils and sponges on hand. So, what can you paint with watercolors? How to make drawings of the highest quality and professional?
Watercolors - for battle
Both experienced artists and beginners, including the youngest, love to paint with watercolors. It contains natural, harmless pigments. The adhesives in these paints are also created by nature. Mainly used are gum arabic, casein, honey, dextrin, and phenol. The brush is moistened with clean water, then paint is drawn up, and then the intended images begin to appear on the surface of the paper.
What can you paint with watercolors? Thanks to the transparency of the pigments, they are able to convey weightlessness, lightness, and freshness. So, for example, to paint something light, weightless with oil paints, you have to apply several opaque shades one on top of the other until the desired effect is achieved. Watercolor is universal remedy, since thanks to the unique structure of the paints it becomes possible to reproduce all genres, original and unpredictable effects. Pigments on paper seem to melt and spread; their mixtures can create various combinations of colors and shades. What can you paint with watercolors for beginners? Whatever the artist’s soul desires.
The question arises: what about gouache? How are they different from gouache? Transparency is what distinguishes watercolor from gouache, where pigments are mixed with white.
There are many interesting ways to paint with this paint. The main ones are described below.
Painting with a flat brush
What can you paint beautifully with watercolors? Let's figure it out. You can paint anything beautifully with watercolors. But there are also unusual ways to do this. There is an interesting method of painting, performed with a flat brush, developed for paints on a wide variety of bases, both water and oil, acrylic. Its principle is as follows: two different colors of paint are applied to the edges of a flat brush.

The work is done on a dry sheet of paper. First, the outline of a square or triangle is drawn to determine the beginning and end of the layer. Next, colors are selected, and a line is drawn from the upper left corner to the right corner (left-handed people start drawing from right to left). With this technique you can create masterpieces! So, plants are often drawn:
- flowers;
- petals;
- floral ornaments;
- snow-covered spruce trees.
Differentiated (in certain areas of the picture) blur
This method is the main one for professional artists. It is done as follows:

What can you paint with watercolors this way? This method is used by artists to depict the sky, large meadows, clearings, water, and various surfaces where it is necessary to convey transparency, lightness and immensity. It becomes possible to convey in the picture all the shades of natural beauty and natural tints. Differential blur helps reveal the richness and magic of natural beauty.
Glazing
What can you paint with watercolors step by step? A method similar to blurring, but in this case the pigment should be applied to a dry sheet of paper. Glazing allows you to adjust the color and tone of the picture, and clearly work out the transitions of shades. When working with glazing, each color should be dried separately in stages. This is how the background of the drawing is created; if the artist wishes, the sky, sea, or any extensive surfaces are drawn.
"Wet on Wet"
What can you paint easily with watercolors? There is a method developed European artists, allowing you to miraculously draw landscapes and natural phenomena. The secret of the method is that the paint is applied to a wet sheet. The entire canvas is evenly wetted with clean water. The easiest way to do this is with a sponge, but a large soft brush will also work. Next, the necessary strokes are applied with a brush, creating unique shapes, shades, and color transitions in the work.
"Dry brush"
This method requires certain skills and dexterity of the artist. An almost dry hard brush is used here. The paper must also remain dry. A large amount of paint is put on the brush and the elaboration of the images begins. On lumpy surfaces it is possible to create clearly defined marks and create effects similar to pencil drawings.

In this way they are created as independent works, and individual elements that are lost in the dim background are worked out. What kind of drawings can be painted with dry brush watercolors? Very often this method is used to create portraits, landscapes, and still lifes. In a word - wherever detailed elaboration of images is required. A “dry brush” is able to bring precision and clarity to a drawing, like a pencil - to show the necessary lines and curves, one might say - to write a whole work about what the artist drew.
Washing off
What can you paint with watercolors? There is another one unusual way the use of watercolor paints used by professional artists. In this case, the pigment must be washed off after it has completely dried. The part of the work that requires correction is moistened with water. Next, blot this area with a soft absorbent cloth. Excess paint, along with water, will remain on the fabric. This technique creates unusual shapes, bends, lines, gives volume to figures, depth of color.
Painting with water
A layer of watercolor is applied to a sheet of paper. When the paint has dried, take a clean brush, moisten it with water and drop drops of water onto the desired areas. This allows you to create layering, volume, and the illusion of cracking rounded shapes.

Glaze
Light-colored watercolor paints are applied one on top of the other in a certain order: lighter shades are lower, darker shades are higher. The pigment is transferred to the sheet of paper with the finest brush strokes only after the previous layer has dried.

As a result, there will be volumetric figures, in which all colors will complement each other without mixing, allowing you to see the boundaries of multi-layer paint application.
scratching
A method that allows you to remove individual areas of paint on a dry surface. In some cases, in this way, within one tone, its enlightenment is made.
Disguise
What can be painted easily with watercolors for children? In principle - anything, but in this method there is an element of mystery and riddle that can attract the attention of any child. On a sheet of paper, before applying a layer of watercolor, use wax or paraffin to cover areas that should remain unpainted. Next, the work is done with paints. As soon as all the paint has dried, the wax can be rolled with your hands, with a brush, or left on the canvas.

Addition
A different color is added to the wet areas of the future work, which in a unique way creates illusions and fanciful tints. Using this method, you can create different color schemes that are not possible with conventional mixing of paints on a palette.
A little history about watercolor painting
More primitive people discovered and began to use natural watercolor pigments. They mixed them with water, applied them to the rocks with their fingers, as well as with simple tools (sticks, bones).
IN ancient Egypt Water-soluble dyes were used to create amazing, original paintings on the walls of pharaonic palaces, tombs, and religious buildings; during excavations, intricate watercolor drawings depicted on papyrus were found.
Watercolor paints were known to masters from Japan and China.

The works were performed on silk, as well as on hand-made rice paper. Artists of the Far East painted contemplative landscapes in the traditions of their schools, filling the images with literary allusions and calligraphy.

In the 18th and 19th centuries, a classical technique was developed in England, which incorporated all the most important and interesting things, allowing one to achieve amazing results using watercolor paints. Watercolor pigments were used in the wash technique, allowing light reflections from the paper surface to be transferred to the canvas.

For centuries, artists prepared their own water-soluble paints, keeping their unique recipes secret. In watercolor painting, the surface on which the artist works also plays a big role. The texture of the canvas is also an obvious and important factor in the work of true professionals. The surface texture of the paper changes under layers of paint, the slippery smoothness of pastels, and under the overlay of collages. All these changes need to be felt, perceived as if they were a continuation of the artist himself, and directed in the right direction.
Each of us is an artist at heart. Remember the golden moments of childhood, when we enthusiastically painted “scribbles” with paints. The art of painting is the world's greatest secret. With the help of paints and a brush, real miracles appear on canvas. Many people mistakenly believe that they do not have artistic talent. In fact, anyone can learn to paint. How to paint real works of art with watercolors? To do this, you just need to follow simple recommendations.
What do we need?
So, we decided to enter the world of art and become artists. How to paint with watercolors correctly? To do this you will need the following tools:
- paints;
- brushes;
- palette;
- sheets of paper.
You should be very careful when choosing accessories. The final result - a work of art - depends on them.

Choosing paints
How to paint with watercolors yourself? First of all, you need to choose the right paints. There is a huge amount of watercolor paints on the shelves of art stores. Which ones are better to choose?
You shouldn't look at the price category here. High cost is not always a guarantee of quality.
It is better to choose paints made from beeswax. The cover should say “honey”. They have the brightest color.
Paint brushes
Brushes have at least important. Which ones are most suitable for watercolors?
The brush should be soft and pick up paint well. Its tip should be pointed. The bristles of the brush should be well secured to the base. The best option would be brushes made from squirrel wool. Their bristles correspond to the stated parameters.
How many brushes will you need? To paint small parts of the picture, you should purchase a thin brush (number 1 or 2). For the main part - greater thickness (numbers 5-6 or 7).
Palette
The palette serves as a kind of “draft”, a place for mixing paints. Several paints of different colors are applied to the palette and mixed. The result is the desired shade.
You can purchase a ready-made plastic palette. You can also make it yourself. For this, a sheet of thick paper is suitable, which should be folded along the edges.
Choosing paper for watercolors
The process of choosing paper should be treated with special attention. The fact is that watercolor is a translucent paint. It requires a large amount of water during operation. If you draw on plain paper, it can quickly get wet from water. It is better to purchase special paper for watercolors. It is denser and thicker. Its surface is rough. Water particles get stuck on the rough surface of the paper. This prevents spreading.

Let's start drawing
How to paint with watercolors yourself? Having studied the main features of watercolor paint, we know that it requires a large amount of water. The drawing turns out translucent, airy, flying. This effect is formed due to the structure of the paint.
There are 2 main techniques for painting with watercolors:
- Dry technique.
- Wet paper technique.
Everyone has been familiar with the basics of dry technique since childhood: we put paint on a brush and paint. Depending on the type of drawing, you can first draw its outline using a pencil.
To get the desired color, you need to dip the brush in water, then in the desired paint and apply it to the palette. After this, the brush is washed with water and dipped into paint of a different color. The resulting colors are mixed on the palette. The result will be the desired shade.
What is the difference between the technique of painting with watercolors on wet paper? This technique is quite interesting, because... it allows you to create an unusual effect. To do this, before you start drawing, you should thoroughly moisten a sheet of paper with water. While it is still wet, watercolor paint is applied to the wet paper. When mixed with water, it spreads, leaving intricate patterns on the paper.
Let's draw
So, we purchased materials for work. Learned basic drawing techniques. Now you can begin the creative process directly.
How to paint with watercolors for beginners? First, it is recommended to try to study paints. What will it take? Let's look at the main lessons for learning about paints:
- Let's study colors. Take a sheet of watercolor paper. Load your brush with the color you like. Put it on paper. Look at the effect. Now increase the degree of pressure on the brush. Look how the color has changed (it should darken). Now fill the brush with more water and dip it into the paint. Run a wet brush over the paper - the design will be translucent.
- Mix colors. Try mixing several colors. What shades did you get as a result?
- Apply yellow, orange, red colors to the leaf. Study them. What emotions do they evoke? Now apply blue, purple, black colors to the sheet. What sensations arise now?
- We draw from life. Now we need to learn how to display the objects around us. Place an apple in front of you. Study it carefully. Look what color it is. Try drawing it.
Practical work
After learning the basic skills of painting, you can move on to independent work.
We learn to paint the objects around us with watercolors. Look around. What do you see? You can draw a still life. To do this, place several pieces of dishes and any fruit in front of you. Try to draw them.
What else can you paint with watercolors? There are no restrictions here. It all depends on the artist’s imagination. We can draw everything that surrounds us. You can depict your own imaginary world.
You can start learning basic techniques for working with watercolors by painting flowers and trees.

How to draw a flower?
Draw a flower in watercolor yourself:
- Think about what kind of flower you should draw.
- Study its primary colors.
- Using a simple pencil, draw the main outline onto the paper.
- Choose a paint for the background and paint over it.
- After the background has dried, you can begin painting with watercolors.
- Paint the flower with translucent paint.
- After the watercolor has dried, paint the outline with darker paint.
- After the drawing has dried, place accents on the flower. This will give it volume. To place accents, you need to apply several thick strokes along the contour of the flower with contrasting paint. Our drawing is ready.
Painting with watercolors is an easy and very exciting activity. Each of us can feel like a real artist, creating entire works of art. You just have to listen to the advice offered.
All children love to draw. But sometimes a child doesn’t get what he wants. Or maybe he doesn’t have enough familiar ways to express himself? Then you can inspire him to experiment with different techniques, among which he will definitely find his favorite one. After this, your child will probably want to invent something new.
Dot patterns

First we draw the simplest squiggle. Then, using a cotton swab and paints (gouache or acrylic), we make intricate patterns to suit your taste. It is better to pre-mix the paints and dilute them slightly with water on the palette.
Frottage

A technique familiar and loved by many since childhood. We place an object with a slightly protruding relief under a sheet of paper and paint over it with pastel, chalk or an unsharpened pencil.
Foam prints

By dipping a sponge in thick gouache, the child can draw landscapes, bouquets of flowers, lilac branches or animals.
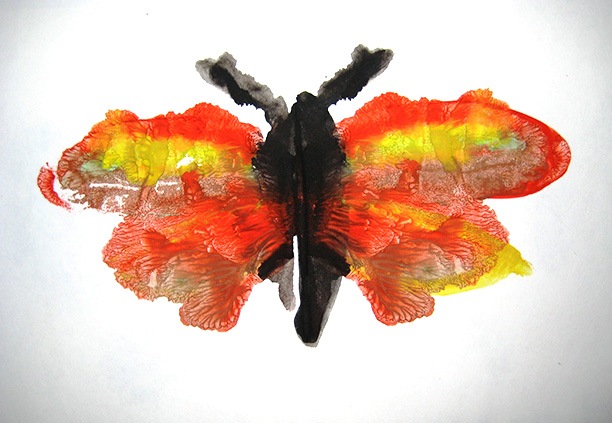
Blotography


One option: drop paint onto a sheet and tilt it in different directions to create an image. Second: the child dips the brush into the paint, then places the blot on a sheet of paper and folds the sheet in half so that the blot is imprinted on the second half of the sheet. Then he unfolds the sheet and tries to understand who or what the drawing resembles.
You can see other drawings using the klyasography method
Hand and foot prints
It's simple: you need to dip your foot or palm in the paint and make an imprint on paper. And then use your imagination and add a few details.

You can see more about the method of drawing with palms
Paint patterns
For such an application you need to apply a thick layer of paint onto the paper. Then, with the opposite end of the brush, scratch patterns on the still wet paint - various lines and curls. When dry, cut out the desired shapes and paste them onto a thick sheet of paper.

Fingerprints
The name speaks for itself. You need to paint your finger with a thin layer and make an imprint. A couple of strokes with a felt-tip pen - and you're done!

Monotype

A design is applied to a flat, smooth surface (for example, glass) with paint. Then a sheet of paper is applied, and the print is ready. To make it more blurry, the sheet of paper must first be wetted. Once everything is dry, you can add details and outlines if desired.
Scratch

The highlight of the work is that the drawing needs to be scratched. A sheet of cardboard is densely shaded with spots of multi-colored oil pastels. Then you need to mix black gouache with soap on a palette and paint over the entire sketch. When the paint is completely dry, use a toothpick to scratch the design.
Air colors

To make the paint, mix a tablespoon of self-raising flour, a few drops of food coloring and a tablespoon of salt. Add a little water to the consistency of thick sour cream and mix well. The paint can be placed in a pastry syringe or in a small bag. Tie tightly and cut the corner. We draw on paper or regular cardboard. Place the finished drawing in the microwave at maximum mode for 10-30 seconds.
Marbled paper

Paint a sheet of paper yellow acrylic paint. When it is completely dry, paint it again with diluted pink paint and immediately cover it cling film. The film needs to be crumpled and gathered into folds, since they are the ones that will create the desired pattern. We wait until it dries completely and remove the film.
Painting with water

We draw with watercolors a simple figure and fill it with water. Until it dries, we put colored blots on it so that they mix with each other and form smooth transitions like this.
Prints of vegetables and fruits

Vegetables or fruits need to be cut in half. Then you can cut out some kind of pattern on it or leave it as is. We dip it in paint and make impressions on paper. You can use an apple, potato, carrot or celery for prints.
Leaf prints

The principle is the same. We smear the leaves with paint and make prints on paper.
Drawings with salt

If sprinkled while still wet watercolor drawing salt, it will become saturated with paint and, when dry, will create a grainy effect.
Brush instead of a brush

Sometimes, for the sake of experimentation, it's worth trying something unexpected. For example, a household brush.
Ebru, or painting on water

We will need a container of water. The main requirement is that its area coincides with the area of the sheet of paper. You can use an oven broiler or a large tray. You will also need oil paints, a solvent for them and a brush. The idea is to create patterns with paint on water, and then dip a sheet of paper into them. How it's done: www.youtube.com
Cracked wax effect

Using wax pencils, draw an image on thin paper. In our case - a flower. The background must be completely shaded. Crumple it well and then straighten the sheet with the pattern. We paint it with dark paint so that it goes into all the cracks. We rinse the drawing under the tap and dry it. If necessary, smooth it with an iron.
You can see about drawing on crumpled paper
Cardboard prints with shift

We cut the cardboard into small strips, approximately 1.5 × 3 cm. Dip the edge of a piece of cardboard into paint, press it vertically to the paper and evenly move it to the side. You will get wide lines from which the drawing is created.
Fist prints

For such a drawing, the child will have to clench his hands into fists. Then dip back side fingers into the paint and make imprints, creating the desired shape. Fish and crabs can be created using fingerprints.
WikiHow works like a wiki, which means that many of our articles are written by multiple authors. This article was produced by 13 people, including anonymously, to edit and improve it.
This article is intended for beginners, that is, for those who are about to start learning something new, since any road begins with the first step. Just get started and take your time and try to enjoy the process of learning how to draw! Watercolor painting is both enjoyable and a little challenging. It all depends on your approach. Watercolor is one of the most versatile genres of painting, in which you can paint almost anything: from realistic concrete images to abstraction and impressionism. Beginners are advised not to start with the idea of creating a masterpiece, but with small steps, gradually and slowly.
Before you feel completely comfortable with watercolors, you will have to paint a lot. Don't give up if your first attempts are less successful than you would like. Mastering the watercolor technique requires a lot of effort and time, but it's worth it!
So, let's begin!
Steps
-
Once the watercolor is completely dry, mix a small amount of paint in a contrasting shade and quickly paint over the area. This will change the color and if done correctly will not blur the image. Light golden paint applied by glazing to illuminated areas of the landscape can make sunlight much more expressive. Read books and articles on watercolors and try to get new ideas from them. Watch videos on YouTube and other portals to learn more about watercolor painting techniques. After that, try to draw something you really like. Interesting view
- painting is Sumi-E or Japanese ink painting, which transforms beautifully into watercolor drawings.
- Many instructors begin their courses by teaching the wet-on-wet-paper technique, but it is preferable to begin by introducing the most common technique, wet-on-dry-paper.
- If you use quality embossed watercolor paper (such as Arches), don't throw away any sketches or failed paintings you made on it. You can always paint over them again with acrylic or gouache or use it as a background for pastel painting. This paper will also look better no matter what you paint on it, and if you paint something beautiful, your painting will last longer without yellowing. Watercolor paints are produced in various forms
- Try to find a type of paper that suits your painting style. Different types of paper have different characteristics. Arches paper does not have most of the disadvantages and is the most versatile, even allowing you to wash off a watercolor image, dry it and reuse it.
- If you use paint in pans, do not throw them away after the paint runs out. You can always reuse the ditches by filling them with paint from tubes, after rinsing them thoroughly, and you will have the opportunity to fill the ditches with your favorite colors without relying on the standard sets in which the ditches are supplied.
- Don't buy the most expensive paper or natural sable brushes. You can spend a large amount of money on the purchase, but this is not necessary! Quality synthetic brushes, a small palette of good paint (artist paint is better than student paint) and 300gsm cold pressed paper is most suitable for beginning artists. Buy a few supplies to start with and gradually add more as needed.
- Watercolor pan sets are convenient for painting outdoors or while traveling. They are not as easy to mix in large quantities, but they are very useful for wet-brush-on-dry paper work. For travel, it is better to choose a brush with a medium or large tip with a pointed tip, included in the sets of paints in cuvettes. However, for drawing small parts you will need a smaller brush. A pocket-sized block of watercolor paper is ideal for sketching during travel, class, or lunch breaks. Some sets (like Winsor & Newton) include a water bottle, collapsible palette lids, and so on.
- One of the best manufacturers watercolor paints company is Winsor & Newton. The Cotman brand is designed specifically for use by beginners. It is cheaper and therefore you can experiment without worrying about high costs. Winsor & Newton Cotman accessories are of excellent quality and are suitable for students.
- The wet-brush-on-wet-paper method also works well over the wet-on-dry-paper method within the same painting.
Place a sheet of thick paper on the table. Draw something very primitive with a simple pencil. For example, square or circle
Apply a small amount of watercolor of any color to the white surface of the palette.
Wet the brush a little. If the brush absorbs too much water, remove it with a cloth or shake it lightly.
Drip a little water from the brush onto the paint previously applied to the palette. One or two drops is enough, no more.
Dip the brush into the paint and water that has formed on the palette and pick up a small amount of paint. Next, paint over the geometric figure drawn on a piece of paper. If the paint is too thick and won't spread, dip your brush in water and try again. Continue experimenting with different amounts of water and paint in the mixture until you get the consistency you want. If you want light, dry shades with a dry brush effect, you will need less water. If you want juiciness and brightness, then, accordingly, more, etc. Completely paint over the geometric shape drawn on paper.
Let the drawing dry.
Take a piece of watercolor paper and secure it to the drawing board using special adhesive tape. Use a large brush or sponge to dampen the entire surface of the paper. After this, try applying several strokes of watercolor paint in different colors. See what results are obtained with different degrees of paper moisture when applying different colors of paint.
If you use paper that is too wet, you can end up with a very smooth and light color. Paint of different colors is mixed on paper, allowing you to obtain new shades. Try putting a blue stripe on wet paper next to a yellow or gold stripe, and then a red stripe. You will see how the colors mix, creating uniform color transitions.
Try letting the test design dry until the shine is gone and the paper is still damp. Now the applied stripes will still have soft edges, but will become a little more defined. Once the paint has completely dried, add details with a wet brush on dry paper.
To begin with, try to depict a very simple object that can be multi-colored. Mix up some sky blue paint. Draw a sketch of the hills and tree. First paint them with a wet brush on wet paper. After that, start adding some larger details with a wet brush. Finally, when the paper is completely dry, add fine details with a wet brush on dry paper. That is, the larger the parts, the moister the paper should be.
You can determine that the paper is completely dry by its temperature, which can be checked by holding the back of your hand over the paper, but without touching it.
There should be no cold coming from the leaf. In order to acquire the skill of determining temperature in this way, you will need to practice a little. But this is necessary, since any touch can lead to damage to the design and the appearance of greasy stains from the skin of the palms on its surface. Do not remove the adhesive tape until the paper is completely dry. The tape helps the paper not curl, keeps it straight and flat, eliminating the formation of unevenness caused by changes in humidity and exposure to paint.
You can use ready-made watercolor blocks in which all four sides of the paper are glued, like the top edge of a notebook. It's a little more expensive, but very convenient for a beginner.
Try drawing on paper with a white or wax pencil, or the tip of a candle, to see how the lines appear when watercolor paint is applied to them.
Try cutting out shapes from adhesive masking film and painting over the resulting stencil to get specific outlines.
Anything covered with stencil film will remain unpainted. Always start your watercolor paintings by painting in the darker areas and outlining the lighter areas.
Isolate or mask out anything that needs to remain white. Get used to the "negative image" as this will also help you get more accurate outlines of objects than if you draw them first and then outline the background. Try starting your image of the cup with its surroundings and the background behind the handle, leaving the details of the cup itself for last. You will feel a big difference in image accuracy! Try the "glazing" technique.
magic techniques For children's creativity">
10 simple magic techniques for children's creativity
1. Monotype
Essence: imprint of paint on paper from a smooth surface. What do you need: a piece of glass or tile, paper, watercolor, soft brushes, water. Process: We wet the glass, apply spots of paint on it, put a sheet on top, carefully turn it over and remove the glass. What happens: very picturesque stains that give room for imagination: “Look, mom, these are clouds! And here is the forest... And here are the waves!”Of course, God himself then ordered that what he saw among the spots be supplemented with details. Using this technique, you can make a background, and draw a graphic image on it, using a thin gel pen - when it dries.

You can create targeted prints, including symmetrical ones: paint is applied to one half of the sheet, then we fold it and get the second half of the picture!
You can “print” with paint different forms- for example, from leaves or templates cut out of cardboard. Then it is better to take thicker paints - gouache or acrylic.

Or pre-apply cut-out simple stencils to the sheet - then the background will be colorful and the images will be white.

2. Blotography
Essence: You can “inflate” original figures from colorful blots. What do you need: thick paper, thick brush, gouache, drinking straws. What happens: we drip paint onto the sheet, then we blow on it through a straw, making lines. Then, depending on what we see, we complement the image with a drawing or appliqué.
This technique is especially great for drawing trees - the branches come out very naturally curved.

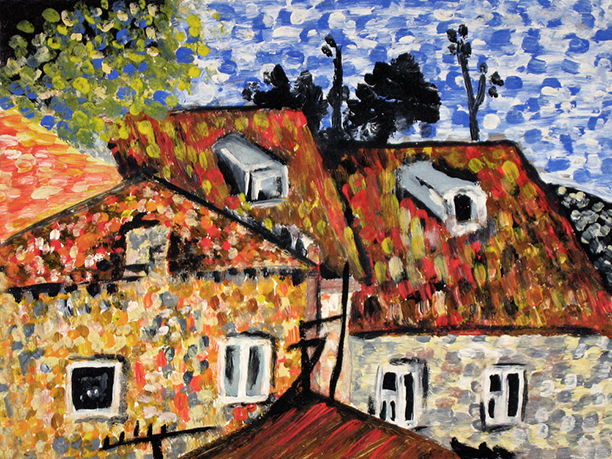
3. Fun dots
Essence: For professional artists this is a separate style, called “pointillism”. What do you need: paper, gouache, palette, cotton swabs. What happens: We apply paint of different colors to the palette, dip the sticks - and tightly cover the space with colored dots. For convenience, we’ll first make a light pencil sketch.
You can draw with dots using brushes, but, unlike sticks, you will need to be careful about washing them. Another cool dots are fabric outlines, but you should work with them carefully so as not to squeeze out too much and make puddles.
4. Spray
Essence: What children love is to splash. And doing it with paint is much more fun, and even meaningful! What do you need: paper, liquid paint, stencils (silhouettes cut out of cardboard), old toothbrushes. What happens: We put our stencils on the leaf - and with the help of a brush we “spray” the paint on the surface, then we remove the cardboards and see the pictures. You can apply several layers - both contour images and paints.
5. Scratches
Essence: this technique is elegant French name“grattage”. What do you need: wax pencils, gouache, paper, liquid soap, a candle and a thin stick (for example, a knitting needle or a used rod). What happens: We color the sheet with pencils, then rub it with a candle, and cover it with a layer of dark gouache mixed with soap (so that it lies evenly). When the paint dries a little, scratch the design on it. It turns out very unusual and mysterious, especially the night and space scenes.
6. Candle arts
Essence: the drawing magically appears - white lines on a colored background. What do you need: paper, candle, watercolor paints and a wide brush. What happens: We draw the outlines of some objects or creatures on paper with a candle, like a felt-tip pen. Then we cover the sheet with watercolors. As the paint flows off the paraffin or wax, the outlines they draw remain white or dotted.
7. Paper mosaic
Essence: Ancient artists decorated temples and palaces this way, and we can do the same at home. What do you need: a sheet of thick paper, a glue stick, colored paper, scissors. What happens: colored paper cut into strips and then into small squares. We draw the outline of the drawing with a simple pencil, carefully cover the sheet with glue and sculpt a mosaic on it. It turns out beautifully when the slightly visible background is dark.